- On your computer, open Google Earth.
- Search for a place, or select a location on the globe.
- On the left, click Measure. . …
- Click the map to set measurement points.
- To remove a point, on the right, click Undo .
- To complete your line measurement, double-click on your last point, or click Done .

How To Measure A Roof Using Google Earth
To begin, go to Google Earth and click to “Launch Earth.” Search for your home’s address and you’re ready to go!
To get multiple views of your roof, you can:
- Use the scroll wheel on your mouse to zoom in and out.
- Left click and drag to move the image around.
- Rotate the camera by clicking on the scroll wheel and dragging on the mouse.
Step One: Printing a Top View Of Roof With Google Earth
You should start measuring by printing out a top view of your home. To do this, simply line up your house and click on the top corner to print.
Be sure to print multiple angles and views. The more roofing details you provide, the more accurate your estimate will be. These additional angles will also show the supplier if there are any additional valleys, peaks, entryways, or window hangs that may be needed.
Step Two: Begin Measuring Your Roof
- Frame your home back to the top shot. NOTE: You’ll want to be directly above and zoomed in as much as possible.
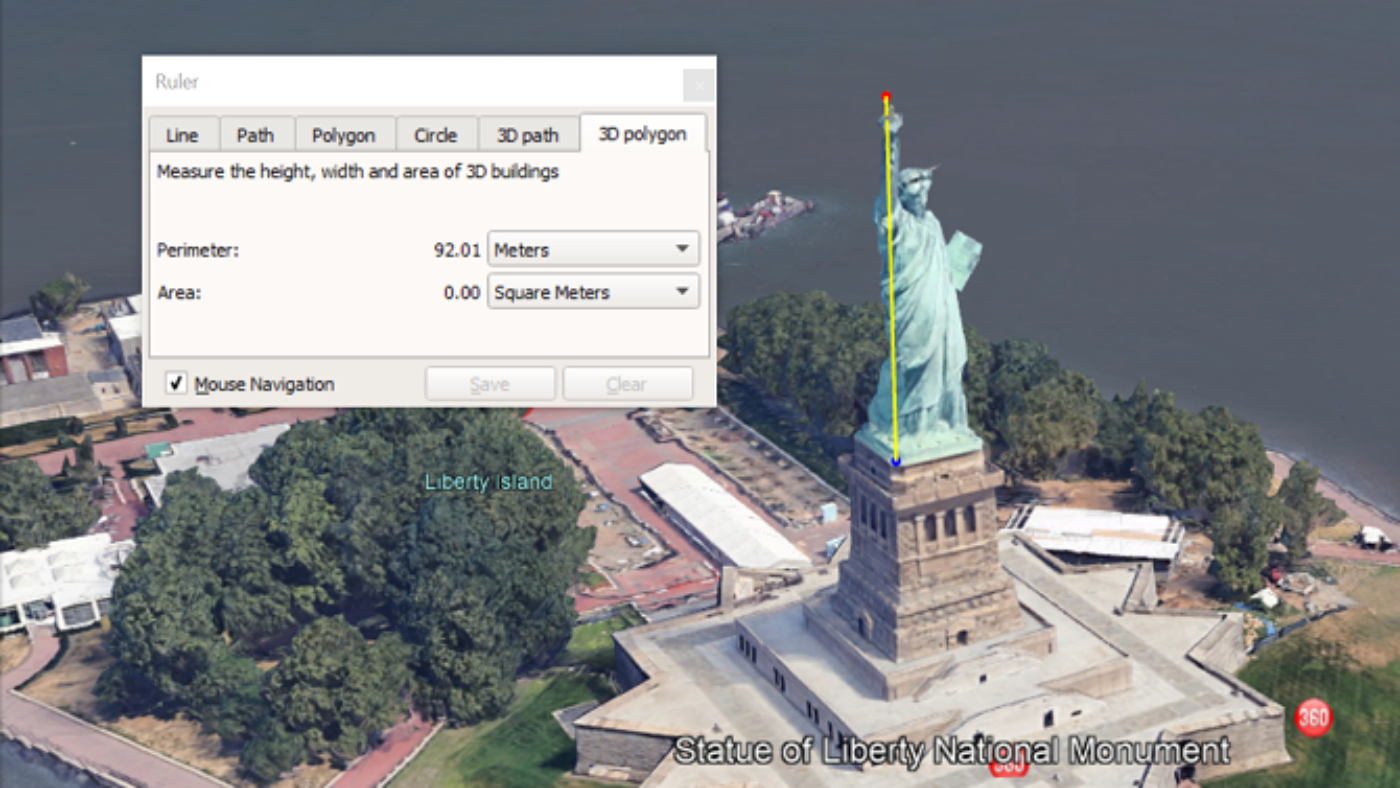
- Click the ruler icon on the left side of your screen.
- Switch the unit of measurement to feet.
- Click on a starting and stopping point, and you’ll get an estimated measure of distance.
- Start logging in your measurements.
NOTE: The measurement tool won’t be as accurate with slopes as it is with straight runs. It’s best to angle the camera and get various measurements to see which is closest in comparison to surrounding measurements.
It’s always best to go outside and check a few measurements to make sure what you’re estimating on Google Earth is in the ballpark.
Step Three: Using Your Sketch To Get A Metal Roofing Quote
When complete, you’ll have a general idea of the size of your roof to send to a metal roofing supplier for an estimate. Click Here for more details Please.
Google Earth also offers a perimeter for the shape of the area that you can use to measure out the edges or area of a lawn, fencing, yard, the roof and more. As long as you keep in mind that these are only the most basic of guidelines, you’re going to be okay in your calculations. Since you’re using Google you’ll have to factor in any changes that may have been made since the satellite pictures have been taken and remember that the slightest changes may not be yet showing on your pictures.
Once you have a basic starting point you can go from there and make the necessary adjustments to have an accurate reading of the roof shape and size and factor in any other necessary adjustments that need to be made on your calculation.
Calculate the Surface Area of the Roof
You’ll notice as an area is drawn the area and perimeter results are displayed in the bottom right corner. With a single pitch roof you’ll have only one area result that relates to the entire footprint or perimeter of the roof. Both metric and imperial measurement systems are displayed in a popup menu over the results area.
Take your area result and multiply it by the pitch multiplier (or slope correction factor) found in the table above to arrive at the roof’s surface area. Now you’re ready to price out the materials.
For multi-pitched roofs simply add the areas of all common pitches together by toggling layer visibility from the summed layer (identified by the ‘eye’ symbol) at the left of the layers control.
Use the appropriate pitch multiplier for each totaled area calculated, then sum all the areas together.