Estimate Roof Size

How to Calculate Roof Area

To calculate your roof area, simply multiply your roof length by your roof slope height, and multiply this by two. This should give you the total area of your roof, not accounting for a chimney or other sections of your roof not covered by tiles

Things You Will Need

  • Square footage of your house

  • Pitch of your roof

  • Calculator

  • Paper and Pen

Tip

This calculation will give a solid estimate for a single slope roof and a simple gable roof with a single pitch. For more complex roof lines with multiple pitch angles, it’s a little more complicated but the same steps can be followed; just break down the roof into separate sections with a different square footage for each different pitch angle.

Step 1: Sketch Roof Outline

Sketch the roof outline using ground measurements as shown in Figure 1 below. Knowing the longest dimension first will help you to scale your drawing appropriately.

Step 2: Fill in Roof Details

Measure and sketch out dormers, hips, valleys, diagonal distances and protrusions or overhangs. Chimneys, vents, skylights and pipe sizes will need to be measured to calculate trims and flashings needed for the job.

Pro Tip: You may need binoculars to count units of existing roof materials in unreachable areas. If different pitches exist on adjacent sides of a valley or hip, it’s length can be determined by treating the hip or valley as the diagonal (hypotenuse) of a right triangle on the roof pane next to it.

Roof Outline Plan Drawing

Figure 1. Sketching Your Roof Plan

Step 3: Determine Roof Pitch

Pitch refers to the angle of the roof, or how steep it is. Measured by inches of rise (vertical measure) over 12 inches of run (horizontal measure) In the gable diagram in figure 2. (below) there are 4 units of rise and 6 units of run. This can be converted to units of rise over 12 by understanding that cross products in step 2 must be equal. There Therefore 4 x 12 must equal 6 x X. Step 3 shows that X must equal 48 divided by 6. Therefore X equals 8 and the pitch is 8/12.

Formula for Calculating Roof Pitch

Figure 2. Calculating Roof Pitch

A Note About Pythagorean Theorem (Yes, You Need It in Real Life)

If you know the measurement of two sides of a right triangle, but not the third side, then the Pythagorean Theorem from 8th Grade geometry is your best friend. In Figure 2 above, rise squared (multiplied by itself) plus run squared equals the diagonal squared. In the diagram,  a+ b2 = c2. If the rise is 42 + 62 = c2, then 16 + 36 = c2 – So c = the square root of 52. Pythagorean Theorem tells us that the gable (diagonal) length is 7.21’ or about 7’ 3”.

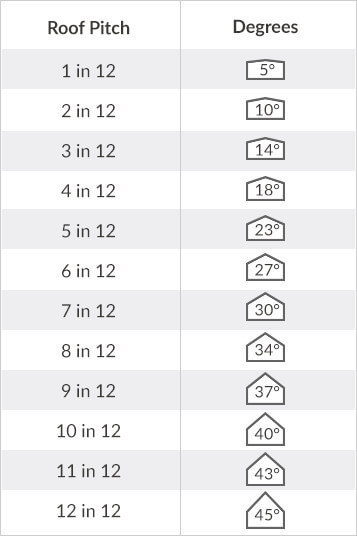
Roof Pitches in Degrees
Use Our Roofing Calculator

Step 4: Calculate The Simple Roof Areas

On a simple hip or gable roof, multiplying the eave to ridge length by eave length will give the area to be multiplied by pitch factor. Ridge vent openings are best finished with coil rather than partial shingle. Using flat coil stock allows the ridge caps to lay flat and can also be formed with an extra water stop at the ridge opening.

Area for the roof in Figure 3 is 1784 ftThe blue dash line divides the roof into 2 rectangles. There is a small area calculated as 8/12 that is actually 4/12. On a small area such as this, it is better to err on the side of the higher pitch since it should not significantly affect the total.

Pro Tip: Pythagorean Theorem can be used to calculate the length of the valleys. A general rule of thumb is to add at least 12” lineal inches of valley material to be safe.

Plan for Calculating Simple Roof Areas

Figure 3. Calculating Simple Roof Areas

Step 5: Calculate The Complex Roof Areas

Most roofs in Canada would be considered on the complex side. Multiple adjacent pitches, dormers, and turrets are common. Keep in mind that an experienced metal roofing contractor will need to factor in extended labour time for areas of your roof that will require precision metalworking skills.

Start by finding the “footprint” area and multiply by the correct slope factor determined by pitch (see Pitch Factor Chart bottom of page). In Figure 4 below, the dashed blue lines give a simplified view of the “footprint”. Multiply L x W to calculate the area for each rectangular section. Note the area of 77ftthat needs to be subtracted for the recessed area.

Once the “footprint” including overhang areas have been determined for each area, find the appropriate slope or pitch factor in the chart below. For example, a roof area with an 8/12 pitch has a slope factor of 1.202 so 2053ftx 1.202 = 2468fttotal roof area.

A Note about complex roofs: Complex roofs need more accessories and trims than“easy” roofs – resulting in a slightly higher total cost/square foot.

How to Calculate Area for Complex Roof

Figure 4. Calculating Complex Roof Area

Step 6: Measuring or Calculating Gable and Hip Lengths

 The slope factor is also used to determine gable lengths when the run length is known. For example, in Figure 4 the bottom left gable measures 16’ across from eave to eave and therefore has a run of 8’. When this is multiplied by 1.202 the gable distance is 9’8” (9.62’ rounded up to nearest inch). Note that this run can also be multiplied by the hip/valley factor of 1.563 to get a valley length of 12’6”.

Record all your calculations on your drawing as seen in Figure 5 below.

Completed Plan Drawing of Roof with Measurements

Figure 5. Completed Roof Plan Drawing


Here's a step-by-step guide to measuring with blueprints

Best Roof Measurement In Virginia

How To Measure A Roof
  • Step 1: How to Calculate Your Roof Square Footage. First, measure the length and width of each surface on the roof, then multiply these values to get the square footage of that surface. …
  • Step 2: How to Determine Your Roof Pitch. …
  • Step 3: Calculating Roof Squares.

How do I calculate the size of my roof?

Multiply your house length by your house width to get the area. (For example, 40 feet x 30 feet = 1,200 square feet.) Next, multiply the area by your roof’s pitch. (1,200 x 1.05 = 1,260 square feet.)

Call Us for Roof Measurements : (315) 926-1777 

OR  Email us : info@skyroofmeasure.com

Square Footage

  1. The first thing you’ll need to measure is the square footage of your roof.
  2. Position your ladder at the corner of one of your roof planes to determine the length.
  3. Extend your measuring tape as far as you can along the length of your roof and mark the area.
  4. Move your ladder down to the next section. Beginning with where you marked the first measurement, measure the next section.
  5. Continue measuring the length of your roof until you’ve covered the entire length area.
  6. Write down the final measurement.
  7. Next, you’ll want to measure the width of your roof plane. (Depending on how high your roof is, you may want to be up on it to take this measurement.)
  8. Use your ladder or your feet to measure the entire width of your roof plane.
  9. Write down the final measurement.
  10. Continue steps 1-9 on each of your roof’s planes.
  11. Multiply the length and width of each plane to get the square footage. Then, add all of your square footage measurements together to get the total square footage of your roof.

Slope

  1. You’ll also need to measure the slope, or angle, of your roof.
  2. To do this, position your ladder near the top point of your roof.
  3. With your measuring tape, measure vertically from the top point to the bottom point of your roof. (This is also called the rise.)
  4. Repeat this over 12 inches, then place the measurement over “12”. (For example: If your rise is 4 inches over 12 inches, then your slope measurement is 4/12.)

Measuring a Roof from the Ground

If you do not feel comfortable climbing onto your roof to take measurements, you can calculate the square footage from the ground. However, know that your measurements will be an estimate and less precise than a on-the-roof measurement. Measuring from the ground usually only works for square or rectangular roofs. If you have an irregular-shaped roof, you will need to measure from the top.

To measure your roof from the ground, use your tape measure to find the length and the width of the home by stretching the tape measure along the exterior walls. If your roof has overhangs, eyeball them and add the approximate length to your measurements.
To estimate the pitch of the roof, go into your attic equipped with a tape measure, pencil, and 18- or 24-inch level. Start by measuring 12 inches from one end of the level and make a mark. Once in the attic, place the level against the bottom of a roof rafter.

Measure vertically from the 12-inch mark to the underside of a rafter. That measurement is the number of inches that your roof rises in 12 inches.

Once you have determined the estimated square footage of your roof, you can proceed in the same way as the first method. This involves dividing your estimate square footage by 100 to determine the amount of materials you will need for your roofing project.

When purchasing materials for your roof, it is a good idea to always buy at least 10 percent more materials than you think you will need to prevent coming up short. Remember, you can always return the materials you do not use to the store.

bigstock--143833370_600x

How to Do a Roof Inspection With a Drone

A drone is a great tool for assessing roof leaks as it enables you to see hard to reach places and take photographs to show to a builder. An insurance Loss Adjuster will also find drone roof inspection photographs very useful. … The cost of a drone roof inspection is usually considerably cheaper than other methods.

Why do a roof inspection With a Drone ?

To estimate roof repair costs

For professional roof repair services, having to physically climb up a roof is not a problem. However, the risk and effort might not be worth it if they are still in the phase of negotiating prices with the clients. For them to provide an accurate estimate of the costs of roof repair, a roof inspection will be in order. In the hands of a good drone pilot, a camera drone can be used to craft a highly detailed roof inspection report – something that could certainly impress more than a few potential clients.

SAFETY

The fact that drones enable an individual to perform a roof inspection while remaining safely on the ground may be the single greatest advantage of their use. More than 300 people die each year in the United States falling from ladders, and over 150k ladder-related injuries are treated in the emergency room. The use of drones all but eliminates this risk entirely.

                                       Please Call Us – (315) 926 – 1777

 To confirm insurance claims

When a natural disaster happens, like a tornado or a typhoon, the roof of a home takes the brunt of the punishment. For this reason, homeowners will typically make insurance claims on the roof damage. When this happens, it is up to insurance adjusters to physically visit these homes, assess the damage, and determine a fair insurance claim.

Of course, in such an event, there will probably be multiple homeowners making the same insurance claims. It would be simply impractical for an insurance adjuster to spend the time climbing up each house. With a drone, the inspection of several houses can be done in a single day. Not only do drones make the job safer, but also much more efficient.

EFFICIENCY

Industry studies show utilizing UAVs for inspecting a roof can cut the inspection time down [on average] from three hours to one. For a roofing estimator or an insurance adjuster, this can prove invaluable allowing them to inspect far more properties in a single day with a higher degree of accuracy.

Grinnell Mutual Now Using Kespry for Drone Roof Inspections - Inside  Unmanned Systems

MANPOWER

Compared to a team of people with ropes and tape measures, generally a single individual is required to inspect a roof. For larger commercial properties a drone pilot may bring along additional VOs (visual observers) to aid in maintaining LOS (line of sight) during the data collection process. Even in this instance, a two-man crew would be completely done before a traditional team even accessed the roof.

Can any drone be used for roof inspections?

The simple answer is no. While there are many great drones, some are better suited for this type of work. In this article, we will highlight the best options for drone roof inspection.

How long does inspection take?

The speed of a drone inspection, from start to finish is amazing and infinitely faster than a manual inspection. Once the basic preparation is done, the inspection can take from 5 to 20 minutes depending on the degree of detail required and the size of the roof.